
30+ Best Drop Fade Haircuts Styles & Maintenance Tips (2026)
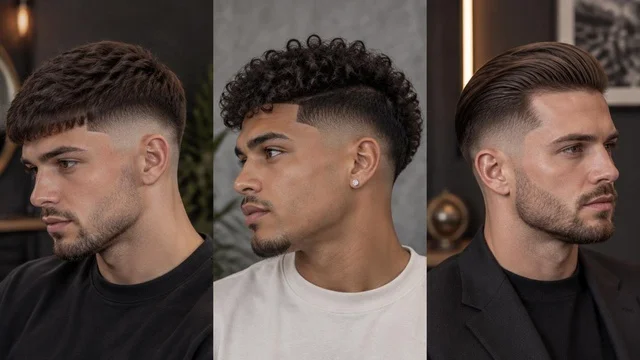
Walk into almost any barbershop in 2026 and you’ll hear the same request more than most others: a drop fade. It’s easy to see why. Unlike a straight fade that runs in a flat line around the head, the drop fade curves gently behind the ear, following the natural shape of your skull instead of cutting across it. The result is a cut that looks more tailored, more deliberate, and honestly just more interesting than a standard fade.
What makes the drop fade so popular is how well it adapts. It works with curly hair, straight hair, waves, buzz cuts, even mullets. You can keep it subtle and professional or push it into bold, high-contrast territory — the curve itself stays the same, but everything around it can change to match your style.
This guide walks through everything you need to know about the drop fade and how this popular Fade Haircut stands out from other fade styles. You’ll discover more than 30 style variations, how barbers create the signature curve, a DIY guide if you’re cutting your own hair, pricing, maintenance, and answers to the questions people ask most. By the end, you’ll know exactly what to ask for the next time you sit in the barber’s chair.
What is a Drop Fade Haircut?
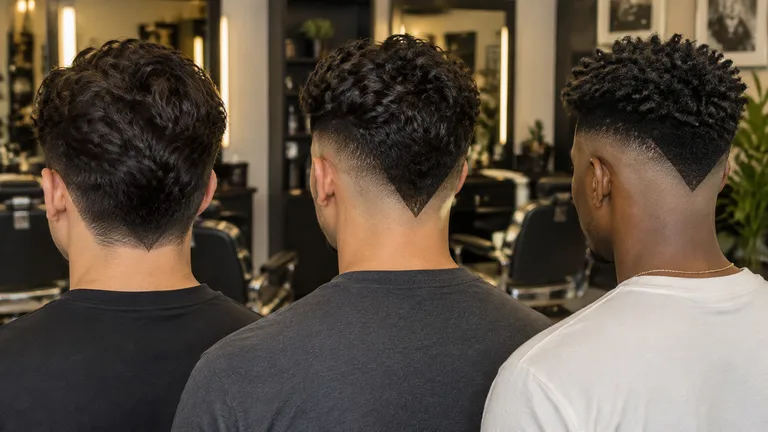
A drop fade haircut is a fade where the line doesn’t run straight around the head — it dips, or “drops,” lower behind the ear before curving back up toward the nape of the neck. Instead of a flat, horizontal fade line, you get a subtle downward curve that follows the natural contour of your skull.
That small change in shape has a bigger effect than you’d expect. It makes the fade look less mechanical and more like it was actually built for your head, because in a sense it was — a skilled barber shapes the drop specifically around your ear and hairline.
How a Drop Fade Differs from a Regular Fade
A regular fade — sometimes called a straight fade — keeps a consistent, level line as it wraps around the head. There’s no curve or dip; the transition from short to long happens at roughly the same height all the way around.
A drop fade breaks that consistency on purpose. Behind the ear, the fade line drops lower before rising back up at the back of the head. It’s a small detail, but it changes the whole character of the cut — a regular fade reads as clean and uniform, while a drop fade reads as more sculpted and intentional.
Drop Fade vs Taper Fade vs Skin Fade
These three terms get mixed up a lot, so here’s the simple version. A taper fade refers to how gradual the fade is — it never goes all the way down to bare skin, just gets progressively shorter. A skin fade refers to how short the fade goes — all the way to the skin at the bottom. A drop fade refers to the shape of the fade line itself — the curve behind the ear.
Because these describe three different things (gradualness, shortness, and shape), you can actually combine them. A “low drop skin fade” is a completely valid, common request — it just means a fade that curves behind the ear, starts low, and goes all the way to the skin.
Why the Drop Fade Curve Matters (The Technique Explained)
The curve isn’t just decorative — it’s there because heads aren’t flat. Right behind the ear, most people’s hairline naturally dips slightly. A straight fade ignores that and can end up looking slightly off in that area. A drop fade works with that natural dip instead of against it, which is part of why it tends to look cleaner and more balanced once it’s done. It does require a bit more skill from the barber, since freehand curving is harder to keep symmetrical than a straight line — which is why it’s worth going to someone experienced with the style specifically.
Low, Mid & High Drop Fade — Which One Should You Choose?
Where the fade starts on your head changes the whole feel of the cut, even with the same drop curve underneath.
Low Drop Fade — Subtle & Professional
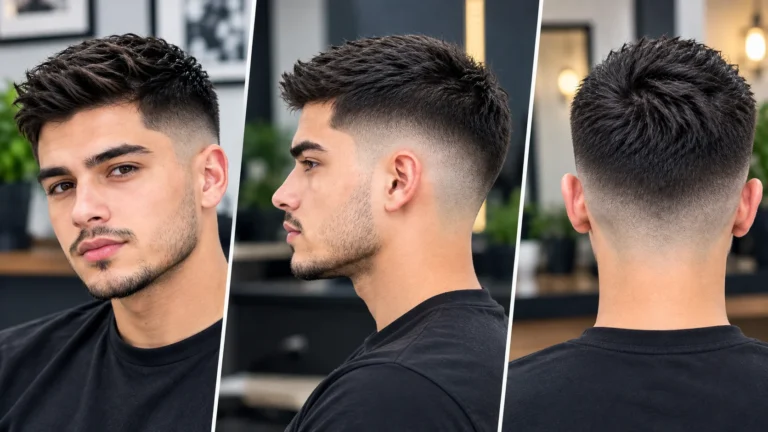
The fade starts just above the ears and stays close to the hairline. This Low Fade Haircut is the most understated version, making it a safe choice for offices, interviews, and anywhere you want to look sharp without drawing too much attention to your sides. It also tends to grow out the most gracefully, since there’s less contrast to lose as the hair grows back.
Mid Drop Fade — Balanced & Versatile
Starting around the middle of the head, the mid drop fade splits the difference — noticeable enough to look intentional, but not so bold that it feels like a statement piece. It’s arguably the most popular version because it suits nearly every face shape and hair type without much compromise either way.
High Drop Fade — Bold & Eye-Catching
This version starts near the top of the head, close to the crown, and creates the most dramatic contrast between the short sides and the top. It’s the choice for men who want their haircut to actually be noticed. It does need more frequent maintenance, since the higher starting point means regrowth becomes visible sooner.
Comparison Table: Low vs Mid vs High Drop Fade
| Feature | Low Drop Fade | Mid Drop Fade | High Drop Fade |
| Starting point | Above ears | Mid-temple | Near crown |
| Contrast level | Subtle | Moderate | Bold |
| Touch-up frequency | Every 3–4 weeks | Every 2–3 weeks | Every 1–2 weeks |
| Best for | Formal settings | Everyday versatility | Statement looks |
| Grows out gracefully | Yes | Somewhat | No |
30+ Best Drop Fade Haircut Styles for 2026
Classic Low Drop Fade

A soft, close-to-the-hairline fade that curves gently behind the ear. It’s the go-to choice if you want the drop fade shape without a lot of contrast — clean, professional, and easy to wear anywhere. Suits nearly all hair types and works especially well on oval and square faces.
Mid Drop Fade

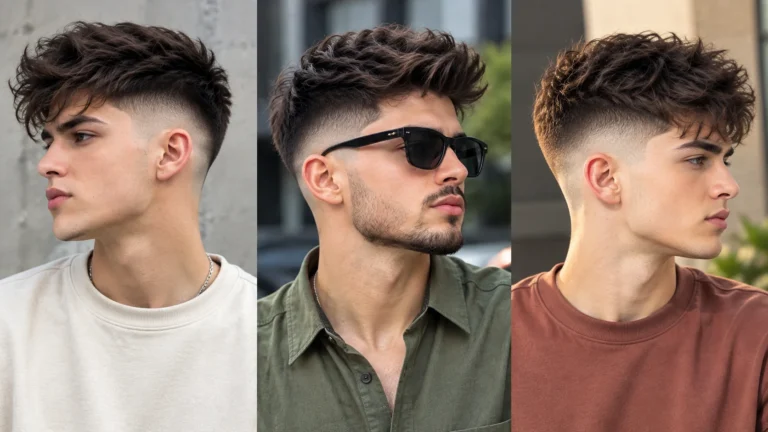
Positioned around the temple area, the Mid Fade Haircut gives you noticeable definition without going overboard. It’s a strong all-rounder — pairs well with textured tops, slick styles, or anything in between. A touch of texturizing spray on top keeps it from looking too flat.
High Drop Fade

The boldest of the three starting points, the High Fade Haircut curves sharply from near the crown down behind the ear. It’s best paired with a shorter top so the contrast reads clearly. This one benefits from thicker hair, since fine hair can sometimes get lost against such a strong fade line.
Drop Fade for Black Men (Afro-Textured Hair)

This version is built around Afro-textured hair, keeping natural curls or coils full on top while the drop curve stays crisp and defined along the sides. A sharp lineup along the front usually finishes the look. Curl sponges or curl creams help keep definition without drying out the hair.
Drop Fade for Straight Hair

Straight hair shows off the drop curve especially clearly, since there’s no texture to soften the line. The top stays smooth and controlled, which gives the whole cut a polished, structured look. A light pomade is usually enough — straight hair doesn’t need much to hold its shape.
Drop Fade for Curly Hair

Curls get to stay full and bouncy on top while the sides taper cleanly into the drop curve. It’s a great option if you want to keep your natural texture front and center rather than fighting it. Curl-defining cream applied to damp hair gives the best results without weighing curls down.
V-Shape Drop Fade

Instead of curving smoothly, the fade line forms a deliberate V-shape at the back of the head before dropping behind the ears. It’s a more graphic, design-forward take on the drop fade that tends to stand out in barbershop portfolios. Keeping the neckline sharp is essential here, since the V shape loses its definition quickly as hair grows.
Short Drop Fade

Everything kept short — top and sides — with just enough length up top to see the drop curve clearly. It’s about as low-effort as this style gets day to day, since there’s barely anything to style. A great option if you want the shape of a drop fade without any of the daily upkeep.
Slick Back Drop Fade

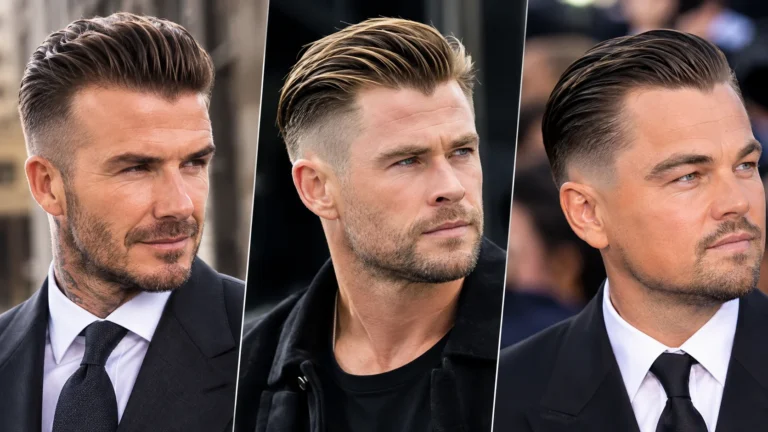
Hair combed straight back on top, held in place with a strong-hold gel, paired with the curved fade underneath. It reads as more formal than most drop fade variations, which makes it a solid pick for weddings, interviews, or any occasion where you want to look put together.
Drop Fade Comb Over

A side part combined with neatly swept-over hair on top and a drop fade below. It’s polished without being stiff, and it works in almost any setting — office, casual outings, formal events. A side-part comb and a light pomade keep the part line clean throughout the day.
Taper Drop Fade

This softens the drop fade by keeping it gradual rather than going down to bare skin. It’s a subtler, more natural-looking version that still has the curved shape but without the sharp skin contrast. Works particularly well for men who want something low-key that still has personality.
Bald/Skin Drop Fade

The fade goes all the way to the skin at its shortest point, creating the boldest possible contrast against the top. It’s eye-catching and modern, but it does need attention — bare skin regrows visibly fast, so touch-ups every two weeks or so keep it looking sharp rather than patchy.
Bulky/Textured Drop Fade

Here the top is left thick and full, contrasting hard against the tightly faded, curved sides. It’s a good option if you naturally have thicker hair and don’t want to lose all that volume. A volumizing powder or spray at the roots helps keep the fullness through the day.
Drop Fade Buzz Cut

About the simplest version on this list — a short, even buzz on top paired with the curved fade at the sides. Almost no daily styling required, which makes it ideal for active lifestyles or anyone who just wants a low-maintenance routine. Regular edge clean-ups every couple of weeks are all it really needs.
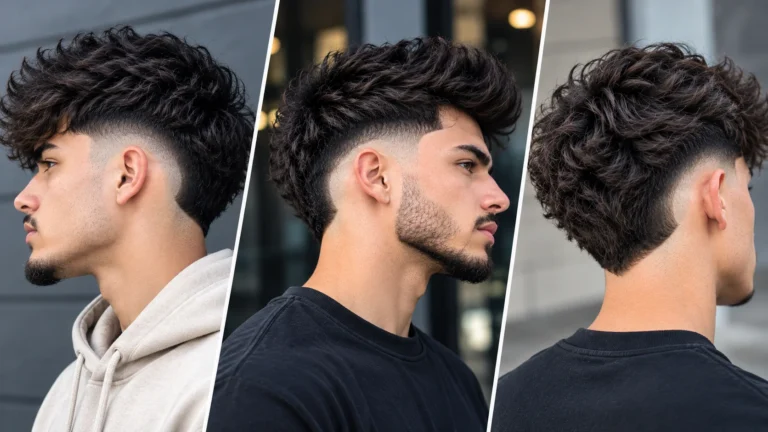
Drop Fade Mullet

Longer hair at the back, faded sides with the drop curve behind the ears. It’s a bold, fashion-forward combination that’s found a real audience among younger, style-conscious guys. Texturizing spray helps give the back some shape and movement rather than letting it sit flat.
Drop Fade with 360 Waves

Built specifically to frame 360 wave patterns, this pairs clean, curved sides with waves brushed consistently in the same direction on top. The fade acts almost like a frame around the waves, making the pattern more visible. Daily brushing is non-negotiable here to keep the wave pattern consistent.
Drop Fade for Asian Hair

Straight, often thicker Asian hair types tend to hold the drop fade’s clean lines especially well. The top usually stays structured and slightly textured, giving a polished but not overly formal look. Blow-drying with a paddle brush helps set the shape without needing heavy product.
Zero Drop Fade (Full Skin Blend)

A more intense version where the fade blends all the way into the skin with almost no gradual transition — just sharp, immediate contrast. It’s a bold, modern choice that stands out quickly, but it also grows out the fastest of any variation here, so it needs the most frequent attention.
Messy Textured Drop Fade

A relaxed, tousled top paired with the clean structure of a drop fade underneath. It’s an easy way to look put-together without looking overly styled — the contrast between the neat sides and the deliberately messy top does most of the work. Sea salt spray is the classic go-to product for this texture.
Drop Fade with Curly Fringe

Curly bangs left longer at the front, falling over the forehead, paired with a drop fade at the sides. It’s youthful and a little playful compared to some of the more formal variations on this list. Curl cream applied while hair is damp helps the fringe keep its shape through the day.
Drop Fade with Beard Blend

The drop fade is extended down into the beard line, so the fade and the facial hair transition into each other seamlessly instead of having a hard stop at the jaw. It gives a more cohesive, groomed look overall. This one is worth asking for specifically, since not every barber blends beard and fade automatically.
Drop Fade for Round Face

For rounder faces, the goal is adding height and reducing width, so this version keeps slightly more length on top while the drop fade trims down bulk at the sides. The added vertical height helps balance out the roundness without looking forced.
Drop Fade for Square Face

Square faces already have strong, defined angles, so this version tends to keep the top softer and slightly rounded to balance out the jawline rather than sharpening it further. The curved drop fade actually complements square faces nicely, since the soft curve offsets the hard angles of the jaw.
Drop Fade for Oval Face

Oval faces are naturally balanced, so almost any top style works here — slicked back, messy, curly, structured. The drop fade simply enhances the natural symmetry rather than needing to correct anything specific.
Drop Fade for Kids

Kids can wear a drop fade too, and it’s often a practical choice since it grows out without looking messy between cuts. Barbers usually keep the curve gentler and the contrast lower than they would for an adult, partly because children’s hair and scalps can be more sensitive to close clipper work. It’s worth telling the barber your child’s age so they can adjust their technique accordingly.
Drop Fade for Women

More women are asking for drop fades too, usually paired with longer hair on top that can be styled in braids, twists, or left natural. It offers a bold, structured look at the sides without needing a full shave. As with any close clipper work, it’s worth discussing scalp sensitivity with your stylist beforehand.
Drop Fade for Thin/Fine Hair

Thin hair actually benefits from the contrast a drop fade creates — the tightly faded sides make the top look fuller by comparison. The key is not going too short on top, since very short lengths can expose thin patches more easily. Lightweight, volumizing products work better here than heavy pomades, which tend to weigh fine hair down.
Drop Fade for Gray Hair

Gray and salt-and-pepper hair actually shows the drop curve especially well, since the natural color transition between gray and darker strands adds visible depth to the fade line. This version tends to read as distinguished rather than aging, and pairs nicely with slightly longer, textured tops.
How to Style a Drop Fade Haircut (Step-by-Step)
Tools & Products You’ll Need
At minimum, you’ll want a wide-tooth comb for detangling, a fine-tooth comb if you’re doing a precise part, a blow dryer if you want lift or volume, and a styling product matched to your hair type. A light hairspray is useful if you need your style to hold through a long day.
Step-by-Step Styling Guide
Start with hair that’s clean and slightly damp, not soaking wet. Comb it through in the direction you naturally want it to sit. If you’re after volume, blow-dry the top section while lifting at the roots with a round brush, aiming the airflow upward rather than flat against the head. Take a small amount of product, warm it between your palms, and work it through evenly rather than concentrating it in one spot. Shape the top with your fingers or a comb, then finish with a light mist of hairspray if you need extra hold.
Best Products by Hair Type
Straight hair generally does best with a light wax or matte clay that adds texture without flattening it. Curly hair benefits from curl creams or light mousses that define curls without stiffening them. Thicker or coarser hair can handle stronger-hold pomades or gels. Fine hair should stick to lightweight, volumizing products, since anything heavy will drag it down.
How Barbers Create a Drop Fade (Technique Breakdown)
Setting the Drop Curve Baseline
The barber starts by identifying the natural dip behind your ear and marking a baseline that follows it rather than cutting straight across. This baseline determines exactly where the fade will curve downward before rising again toward the back of the head.
Blending the Fade Behind the Ear
Using progressively shorter clipper guards, the barber builds the fade gradually into the curve, working in small sections with a flicking motion to avoid creating harsh, visible lines. This is the part of the process that separates an experienced drop fade barber from a beginner — the curve needs to stay smooth and symmetrical on both sides, which takes a steady hand and a good eye.
Finishing the Top Section
Once the sides are blended, the top gets trimmed and shaped based on the chosen style, whether that’s a short textured crop, a longer comb-over, or something in between. The barber finishes by cleaning up the edges around the ears and neckline, and checking both sides in the mirror to confirm the curve matches on each side.
How to Do a Drop Fade at Home (DIY Guide)
Clipper Guards You’ll Need
You’ll want a range of guards from a #0 or #0.5 for the shortest point up through #3 or #4 for blending into the top, plus a separate detail trimmer for precise edging around the ear and neckline — this is especially important for a drop fade, since the curve needs more control than a straight line does.
DIY Step-by-Step Instructions
Set up with good lighting and at least two mirrors so you can actually see the curve behind your ear as you work. Start with your longest guard and gradually move to shorter ones — never jump straight to the shortest guard, since that’s how uneven, patchy fades happen. Follow the natural dip behind your ear rather than trying to force a straight line, and use small upward flicking motions to blend rather than long straight passes. Check both sides frequently and compare them directly in the mirror before finishing with the edger.
Common DIY Mistakes to Avoid
The most common mistake is trying to make the drop curve too sharp or dramatic on the first attempt, which often ends up uneven. Going too fast between guard sizes is another common issue, since it skips the gradual blending that makes the fade look smooth. It’s also worth avoiding your first DIY drop fade attempt right before something important — practice the curve on a less noticeable trim first so you get a feel for it.
How to Ask Your Barber for a Drop Fade
Explaining the Curve & Starting Point
Be specific that you want a “drop fade” so your barber knows to curve the line behind your ears rather than keeping it straight. Then let them know whether you want it low, mid, or high on your head, since that starting point changes the whole look.
Describing Your Top Style
Explain what you want on top — length, texture, and whether you want it styled a particular way like slicked back, textured, or a comb-over. The top and the fade should complement each other, so giving clear direction here helps your barber balance the whole cut.
Requesting a Beard Blend or Clean Neckline
If you have a beard, mention whether you’d like it blended into the fade for a seamless transition. You can also ask for a sharp lineup around your hairline if you want more definition at the front.
Drop Fade Haircut Cost Guide
Barbershop vs Salon Pricing
Traditional barbershops tend to price drop fades more affordably, since it’s a service they perform often and can execute quickly. Salons usually charge more for the same cut, partly because the visit often includes extras like a wash or a longer consultation. Pricing also varies a lot by location — expect to pay more in bigger cities or at higher-end grooming lounges than in smaller towns. It’s always worth checking with a shop directly, since prices shift based on demand and experience level.
Drop Fade Haircut Maintenance
How Often to Get a Touch-Up
Most drop fades hold their shape well for around 2 to 3 weeks. If you’ve gone with a skin or zero drop fade specifically, you’ll likely want a touch-up a little sooner, since bare skin grows back more visibly than tapered sections.
How Long Does a Drop Fade Last?
On average, a drop fade stays sharp for roughly 3 to 4 weeks depending on your hair growth rate and which version you chose. Low drop fades tend to hold their clean look the longest, while high and zero drop fades lose their crispness the fastest since there’s more contrast to maintain.
Growing Out a Drop Fade — What to Expect
Because the drop curve follows your natural hairline shape rather than a straight cut line, it tends to grow out a little more gracefully than some other fade styles — the curve softens gradually rather than turning into a hard, uneven line. That said, the more dramatic versions (high or zero drop fades) will still show growth faster than a low drop fade would.
Common Mistakes to Avoid with a Drop Fade
Going to a barber without a clear reference photo is one of the most common issues, since “drop fade” can mean slightly different things depending on who you ask — a photo removes the guesswork. Choosing a barber who hasn’t done many drop fades specifically is another risk, since the curve takes more skill than a straight fade line. Waiting too long between touch-ups is also worth avoiding, especially with higher or bolder drop fades where the contrast fades unevenly as hair grows. And using the wrong product for your hair type — like a heavy pomade on fine hair — can flatten an otherwise great cut.
FAQs
Conclusion: Which Drop Fade Style is Right for You?
With more than 30 variations to choose from, the right drop fade really comes down to three things: how bold you want the contrast to be, what your hair type naturally does, and how much time you’re willing to spend on touch-ups.
If you want something safe and easy to maintain, a low drop fade is the obvious starting point — subtle, professional, and forgiving as it grows out. If you’ve got curls or waves you want to show off, lean into a curly drop fade or a wave-focused version rather than fighting your natural texture. And if you want your haircut to actually turn heads, a high or zero drop fade delivers that sharp, unmistakable contrast — just be ready for more frequent barber visits.
Whichever direction you go, bring a clear reference photo and be specific about where you want the fade to start, how dramatic you want the curve, and what you want happening on top. The drop fade is flexible enough to work for almost anyone — it’s really just a matter of dialing in the version that matches your style and your routine.


One Comment